I Tested the Coleman WeatherMaster 10-Person Tent (Review)

This page contains affiliate links, and that means that I may earn a commission if you buy something, at no extra cost to you. You can find my full disclosure policy here.

Rating and Summary

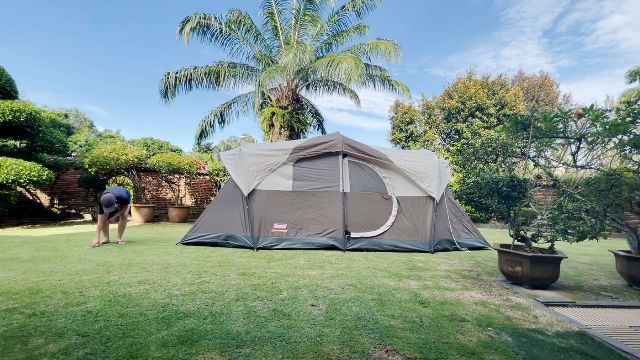
I’ve had the Coleman WeatherMaster 10-Person Tent for about 3 years now, and it’s still in great condition. On top of that, the WeatherMaster Tent has tons of great features, like a hinged D-door, and 2 angled windows, and is really quite inexpensive.

The cons aren’t big issues to me, but I do wish that they made the windows a bit bigger for more ventilation, and also seam taped the seams (instead of making them inverted).

Overall, I found the WeatherMaster 10-Person Tent incredible value for money, and I highly recommend it. If you need more details, this blog post will tell you everything you need to know.

This is a picture of me standing inside the Coleman WeatherMaster 10-Person Tent.
7
Ease of Use
9
Spaciousness
8
Comfort & Features
7.5
Ventilation
7
Rain Protection
9.2
Quality
5
Portability
Overall Score 7.7 / 10
Pros: Good quality, durable, hinged D-door, 2 angled windows, inexpensive
Cons: Windows could be bigger, needs seam sealing, carry bag a bit tight

If you enjoyed the video, please consider subscribing to my YouTube channel right here:

Check out the WeatherMaster 10-Person Tent:

Product Details

Here’s what we’ll discuss here:

  • In the Box
  • Specifications

In the Box

I bought this WeatherMaster 10-Person Tent from Amazon, and got the:

  • Tent body,
  • Rainfly (with pre-attached guylines),
  • Fiberglass poles in a carry case (for the angled windows and hinged D-door),
  • Steel poles in a carry case (for the main tent body),
  • Steel and plastic stakes in a carry case, and
  • Room divider.
In this picture, you'll see the WeatherMaster 10-Person Tent's carry bag, tent body (left), rainfly with pre-attached guylines (middle), and steel poles in a pole bag (right).
In this picture, you’ll see the WeatherMaster 10-Person Tent’s carry bag, tent body (left), rainfly with pre-attached guylines (middle), and steel poles in a pole bag (right).
In this picture from left to right, you'll see the WeatherMaster 10-Person Tent's rainfly, steel poles, fiberglass poles, and stakes. I took them all out of their carry cases.
In this picture from left to right, you’ll see the WeatherMaster 10-Person Tent’s rainfly, steel poles, fiberglass poles, and stakes. I took them all out of their carry cases.

Specifications

Here’s all the data (including my personal measurements) that I gathered on this WeatherMaster 10-Person Tent:

  • Peak height: 80.5 inches
  • Lowest height: 58 inches
  • Longest Length: 16 feet 8 inches
  • Longest Width: 9 feet 1 inch
  • Base Area: 143.6 square feet
  • Floor material: Polyethylene
  • Bathtub Flooring: 7.5 inches
  • Tent body material: 68D Polyester
  • Rainfly material: 75D Polyester Taffeta (450mm)
  • Poles material: Steel (roof and walls), fiberglass (D-door and angled windows)
  • Packed size: 31 by 18 by 12 inches
  • Weight: 30.6 pounds
  • Number of guylines: 6
  • Number of stakes: 16 (10 metal, 6 plastic)
  • Number of windows: 4
  • Number of doors: 2 (one is hinged)
  • Number of vents: None
  • Number of pockets: 4
  • Number of gear lofts: None
  • Number of lantern loops: 1
  • Room divider: Yes (1)
  • E-port: Yes (1)
  • Black-out: No

I also did some testing on my own, and came up with this data:

  • Set up timing (2 people): 10 minutes
  • Set up timing (1 person): 19 minutes
  • Take down timing (2 people): 8.5 minutes
  • Take down timing (1 person): 16 minutes
  • Number of single sleeping pads: 10
  • Number of queen-sized mattresses: 3

I go through all the above specifications in the sections below, in more detail, if you’re interested.

Testing and Performance

I put the Coleman WeatherMaster 10-Person Tent through these 7 tests:

  1. Ease of Use
  2. Spaciousness
  3. Comfort & Features
  4. Ventilation
  5. Rain Protection
  6. Quality
  7. Portability

Here’s how the WeatherMaster 10-Person Tent performed.

Ease of Use

For ease of use, I looked at how easily I could put up, as well as take down and pack up, this WeatherMaster 10-Person Tent. I did this on my own, so 1 person, and also, I tested this with 2 people as well.

How to Set Up

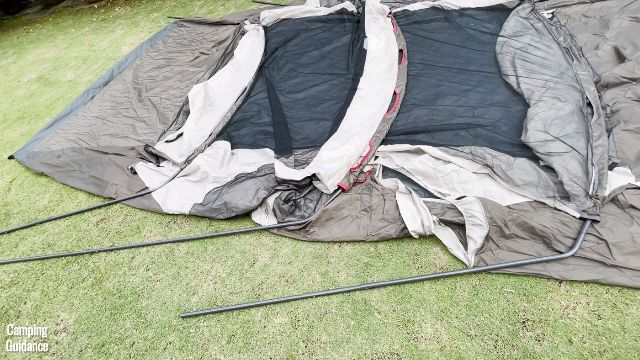
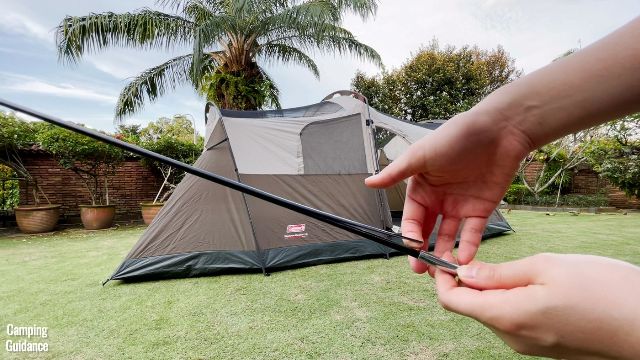
To set up this WeatherMaster 10-Person Tent, assemble all the steel poles. 3 will be slightly curved, and the other 6 will be mostly straight with a bend at one end.

After assembly, here's what all of the WeatherMaster 10-Person Tent's steel poles look like. I put a red box around the 3 curved steel poles, because you need to set those up first.
After assembly, here’s what all of the WeatherMaster 10-Person Tent’s steel poles look like. I put a red box around the 3 curved steel poles, because you need to set those up first.

Next, insert the 3 slightly curved steel poles (in the red box in the picture above) into the 3 pole sleeves across the width of the tent.

One of these curved poles will have a red band or ring, and this is to go into the middle, red-colored pole sleeve.

This is a picture of my brother pointing to the red band on one of the steel poles of the Coleman WeatherMaster 10-Person Tent.
This is a picture of my brother pointing to the red band on one of the steel poles of the Coleman WeatherMaster 10-Person Tent. Notice that the pole sleeve in the middle is red in color for easy identification.

Then, attach the 6 straight steel poles to the 3 slightly curved steel poles. 2 of them will have the red band as well, and these 2 poles are to be attached to both ends of the curved pole (that is already inside the red pole sleeve), like so:

This is a picture of me attaching the straight steel poles with the red-colored band to the curved steel pole, to set up the Coleman WeatherMaster 10-Person Tent.
This is a picture of me attaching the straight steel poles with the red-colored band to the curved steel pole inside the red pole sleeve, to set up the Coleman WeatherMaster 10-Person Tent.

When you’re done attaching all the steel poles, your WeatherMaster 10-Person tent should look like this:

This is what your Coleman WeatherMaster 10-Person Tent will look like after you're done installing all the steel poles.
This is what your Coleman WeatherMaster 10-Person Tent will look like after you’re done installing all the steel poles.

After, stand all the poles up without attaching them to the tent base yet.

Once all the poles have been put up vertically, it’s much easier to insert the bottom of each pole into this Coleman pin at the base of the tent.

Tip: I usually do the 2 poles at the sides first, followed by the middle or center pole.

This is a picture of me attaching the bottom of the steel wall pole to the Coleman pin at the base of the WeatherMaster 10-Person Tent.

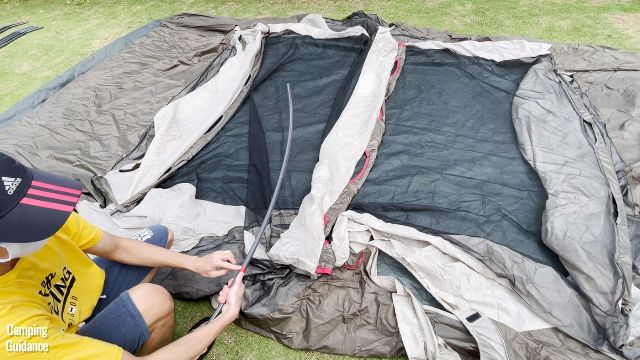
Next, assemble all the fiberglass poles.

This is what all the 4 fiberglass poles of the Coleman WeatherMaster 10-Person Tent will look like when assembled.

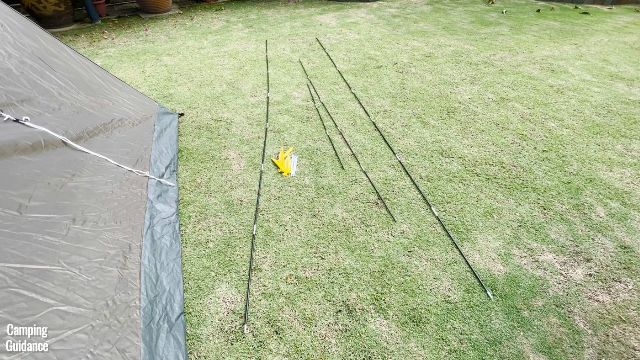
The 2 shortest fiberglass poles are for the hinged D-door. Insert the shortest pole (with 3 fiberglass segments) into the short pole sleeve on the left of the D-door.

Insert the next shortest fiberglass pole (with 5 fiberglass segments) through the curved pole sleeve of the D-door, like so:

This is a picture of my brother and I installing the fiberglass poles for the hinged D-door of the Coleman WeatherMaster 10-Person Tent.

Gently bend the fiberglass pole while zipping up the pole sleeve. To secure each fiberglass pole in place for the D-door, there are rubber gaskets to attach it to (both top and bottom, pictured later under “Quality”).

The other 2 longest fiberglass poles (with 7 fiberglass segments) are for the angled windows at the left and right width of the WeatherMaster tent. To secure each fiberglass pole in place, there will be a small hole to insert the pole into, which you can find on the nearest steel pole.

This is a picture of my brother and I installing the fiberglass pole for the angled window of the Coleman WeatherMaster 10-Person Tent.

Then, attach all the pole clips to the nearest steel pole.

After, grab the rainfly, drape it over the tent.

This is a picture of my brother and I securing the rainfly of the Coleman WeatherMaster 10-Person Tent.

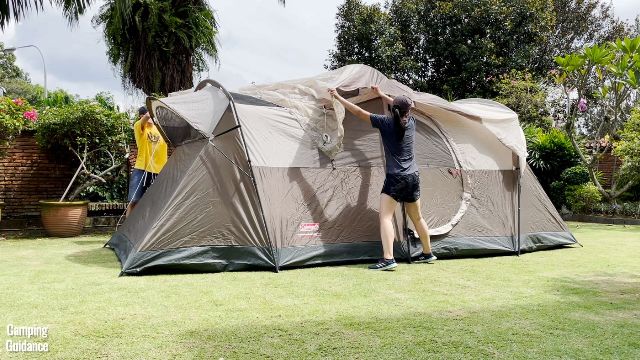
Make sure to secure the rainfly properly over the angled window at each end of the tent, and then attach the S-hooks of the rainfly to these holes in the nearest steel pole:

This is a picture of the S-hook of the Coleman WeatherMaster 10-Person Tent's rainfly, secured to a hole in the nearest steel pole.
This is a picture of the S-hook of the Coleman WeatherMaster 10-Person Tent’s rainfly, secured to a hole in the nearest steel pole.

There are also Velcro attachments to secure under the rainfly, 1 at each middle pole, and 2 at each side pole:

This is a picture of me pointing to one of the Velcro attachment of the rainfly, to be secured to the steel poles of the Coleman WeatherMaster 10-Person Tent.

Finally, stake out the tent. There are 10 standard steel stakes for the base of the tent, and 6 of these yellow stakes for the 6 guylines around the tent.

This is a picture of me using the provided yellow plastic stakes to stake out one of the guylines of the Coleman WeatherMaster 10-Person Tent.

Set Up Timing

It’ll take about ~10 minutes for 2 people to set up this Coleman WeatherMaster 10-Person Tent.

When I put the WeatherMaster 10-Person tent up on my own, it took me about ~19 minutes. I’m only about 5 foot 3, and I was able to set up the entire tent, including the rainfly and the hinged door on my own, with no issues at all.

How to Take Down

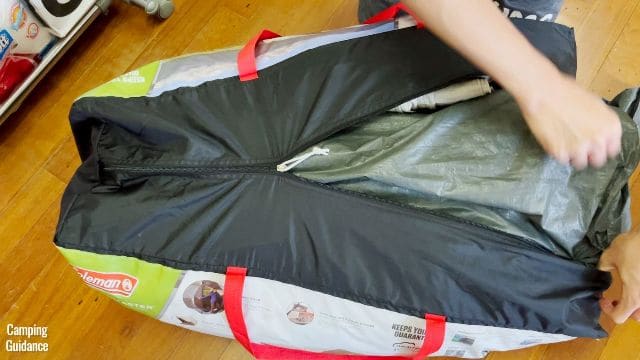
Taking down the Coleman WeatherMaster 10-Person Tent is the exact reverse process of the set up (explained above).

I usually then fold the tent body in half 4 times, roll it up, then fold the rainfly in half 5 times, and stuff everything back into the carry bag. It’s quite a tight fit though, so I recommend getting someone to help you with this:

This is a picture of me trying to stuff everything back into the carry bag of the Coleman WeatherMaster 10-Person Tent.

Take Down Timing

Taking down and packing up the WeatherMaster 10-Person Tent takes about ~8.5 minutes for 2 people, and about ~16 minutes on my own, (excluding washing and drying).

If you want more detailed instructions on how to set up, take down, and pack up this WeatherMaster 10-Person Tent, check out this video that I uploaded, right here:
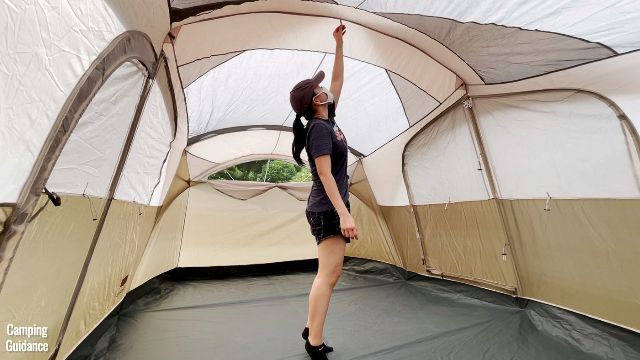
Spaciousness

For spaciousness, I looked at the peak height, slope of the walls, and base area.

Peak Height

This WeatherMaster 10-Person Tent has a peak height of 80.5 inches, and I can reach the top of the tent if I stretch my arm out and stand on tiptoes at the same time.

This is a picture of me reaching the top of the Coleman WeatherMaster 10-Person Tent.

Slope of Walls

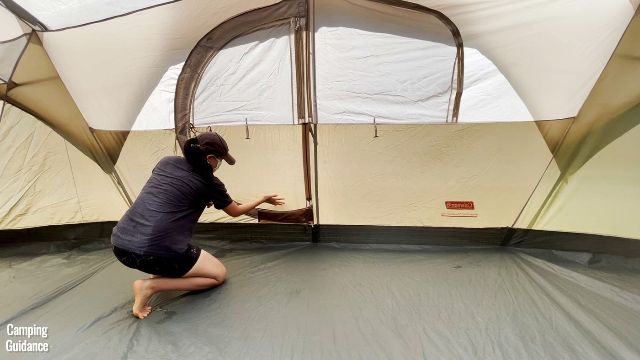
The side walls of this WeatherMaster 10-Person Tent are not really that vertical, especially at this small triangular space here on the widths of the tent:

The sides of the widths of the Coleman WeatherMaster 10-Person Tent are not vertical, and there's a small triangular space.
The sides of the widths of the Coleman WeatherMaster 10-Person Tent are not vertical, and there’s a small triangular space.

Here’s what the small triangular space looks like from the inside:

This is a picture of me sitting in the small triangular space at the widths of the Coleman WeatherMaster 10-Person Tent.

But excluding this space, the lowest height in the tent, which is at the corners of the tent, is about 58 inches. I’m 5 foot 3, so I could not stand upright at the corners, but everywhere else in this tent was fine for me.

Dimensions

The longest length of this WeatherMaster 10-Person Tent is about 16 feet and 8 inches, while the longest width is about 9 feet and 1 inch.

This is a picture of me using a tape measure to measure the longest width of the WeatherMaster 10-Person Tent (9 feet 1 inch).

But just bear in mind that the base area in this WeatherMaster 10-Person Tent isn’t like a nice rectangular shape.

This is what the base area of the Coleman WeatherMaster 10-Person Tent looks like.

FYI, the shortest width of the WeatherMaster 10-Person Tent, right at the edge, is ~7 feet and 1 inch. So, I did the calculations to find out the total base area of the WeatherMaster 10-Person Tent, which is 143.6 square feet.

Mattress Sizing

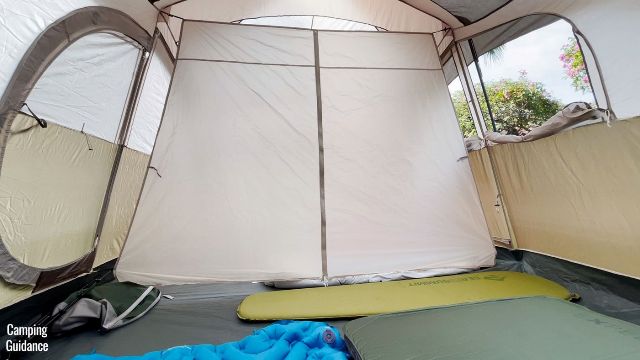
So, that’s why the maximum number of queen-sized camping mattresses I could fit into this WeatherMaster 10-Person Tent was only 3. Here’s what the tent looks like with these 3 queen mattresses.

This is a picture of what 3 queen-sized camping mattresses would look like inside a Coleman WeatherMaster 10-Person Tent.

The mattresses that I used in this tent are slightly smaller than queen size, but almost queen sized (give or take a few inches). Apart from these 3 mattresses, there’s quite a bit of space leftover for camping gear.

Instead of 3 queen-sized mattresses, you can also fit 10 single sleeping pads or sleeping bags, and here’s what having 10 pads in this WeatherMaster 10-person tent looks like:

This is a picture of my Coleman WeatherMaster 10-Person Tent with 10 sleeping pads (a mix of 2 single, 3 double sleeping pads, and 1 full mattress) inside the tent.

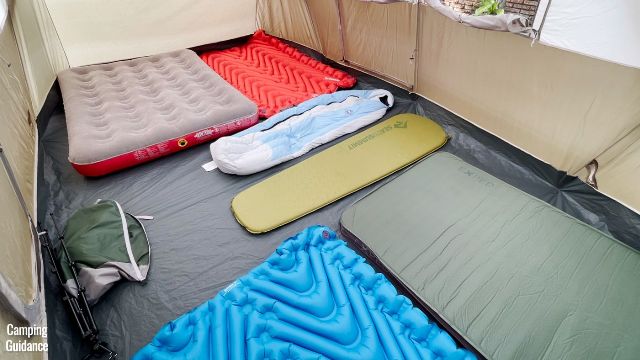
To accommodate 10 people in this tent, it’s almost shoulder-to-shoulder sleeping, although there’s some space (below my 2 single pads, in the picture above) for a little bit of camping gear.

One more thing, there’s no vestibule, so if you leave your shoes out, it will get wet if it rains.

Comfort and Features

For comfort and features, I looked at the windows, doors, bug nets, and more.

Windows

This Coleman WeatherMaster 10-Person Tent has 6 windows around the entire tent, if you include the window mesh of the 2 doors. Excluding the doors, there’s 4 windows.

This is a picture of me opening up 5 windows in the Coleman WeatherMaster 10-Person Tent.

The windows on the length of the tent are a bit smaller, each measuring about 30 inches in length by 28.5 inches in width.

This is a picture of me opening up the 2 windows on the length of the WeatherMaster 10-Person Tent.

The angled windows on each width of the tent measure about 60 inches in length by 17.5 inches in width.

This is a picture of me opening up the angled window in the Coleman WeatherMaster 10-Person Tent.

Each window has 2 zippers, which are pretty much snag-free.

This is a picture of me holding 2 window zippers of the Coleman WeatherMaster 10-Person Tent.

If there’s no rain, you can unzip the windows for more ventilation, and there’s a bug net to prevent larger bugs from getting in. The holes are quite large, so I don’t think this is no-see-um mesh:

This is a picture of the mesh/bug net of the Coleman WeatherMaster 10-Person Tent at night.

You can use this small latch to tie the fabric of the windows up, so that it looks neater.

Each window in the Coleman WeatherMaster 10-Person Tent comes with a small latch to tie the fabric of the windows up.

Doors

The WeatherMaster 10-Person Tent has 2 doors, one at each length of the tent. The front door on the front length of the tent is this hinged D-door.

This is a picture of me taking off my shoes before going into the WeatherMaster 10-Person Tent through the hinged D-door.

The hinged D-door has a handle on both the outside and the inside.

This is a picture of me reaching for the handle of the hinged D-door of the Coleman WeatherMaster 10-Person Tent.

The D-door measures about 47 by 30 inches in dimensions, and is about 59 inches from the ground to the top of the door, so I did have to duck a little when going through the door in and out of the WeatherMaster tent.

This is a picture of me ducking to get through the hinged D-door of the WeatherMaster 10-Person Tent.

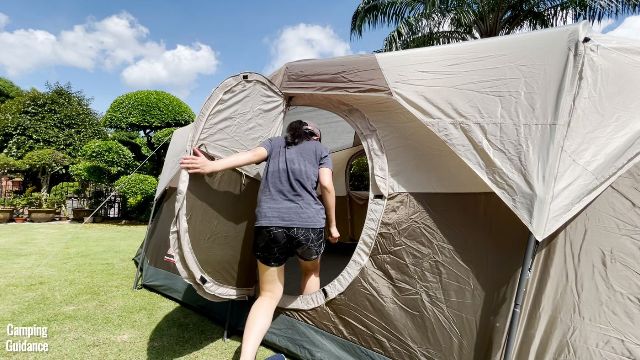
Oh, and here’s what the hinged D-door looks like when I stand in front of it (it’s not very big):

This is a picture of me standing in front of the hinged D-door of the Coleman WeatherMaster 10-Person Tent.

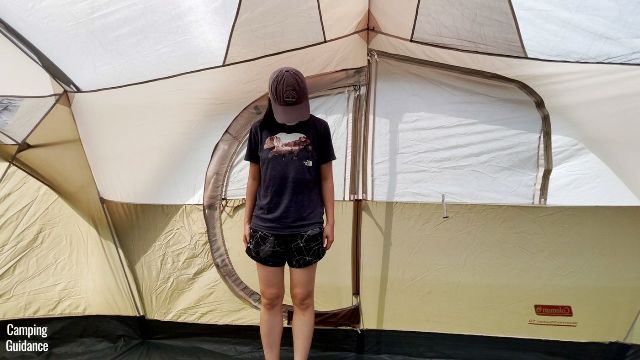
The back door on the back length of the WeatherMaster tent doesn’t come with any fiberglass poles, so it’s not hinged, and you do have to zip it open and close.

This is a picture of me unzipping the back door of the Coleman WeatherMaster 10-Person Tent.

The back door measures about 57 by 34 inches in dimensions. The maximum height from the floor to the top of the door is 65 inches, but it slants downwards (see picture below). So, even at my height of 5’3″, I did have to duck a little when going through the door.

This is a picture of me ducking to get through the back door of the Coleman WeatherMaster 10-Person Tent.
This is a picture of me ducking to get through the back door of the Coleman WeatherMaster 10-Person Tent. Notice that the height of the door slants downwards

The size of this door’s about twice my size, and here’s what it looks like when I stand in front of it:

This is a picture of me standing in front of the back door of the Coleman WeatherMaster 10-Person Tent.

Both doors have bug nets, spanning about half the length of each door.

This is a picture of me unzipping the window mesh of the hinged D-door of the Coleman WeatherMaster 10-Person Tent.

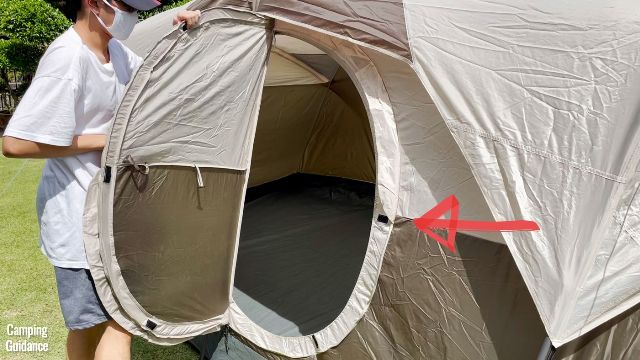
Each door has 2 zippers for the bug net (which is basically the window zipper, pictured above under the “Windows” section), and 2 for the door itself.

The window zippers are white, while the door zippers are black (pictured below):

This is a picture of me holding the 2 black door zippers of the back door of the Coleman WeatherMaster 10-Person Tent.

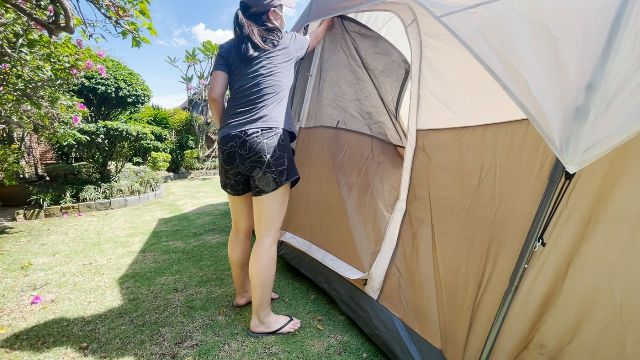
If there are no bugs, you can increase ventilation by unzipping the back door, rolling it up and clipping it to the side right here like this picture below.

There are 2 of these clips or latches for keeping the door open.

This is a picture of my brother unzipping the back door of the WeatherMaster 10-Person Tent and clipping it to the side so that it stays open.

If you need the hinged D-door to stay open, you have to remove the fiberglass poles first. With the fiberglass poles in place, the hinged D-door will not stay open, though you can still zip it up.

If you don’t want to zip the hinged D-door up (Like me! I never zip it up because I’m lazy.), the Velcro attachments around the hinged D-door will keep the door closed.
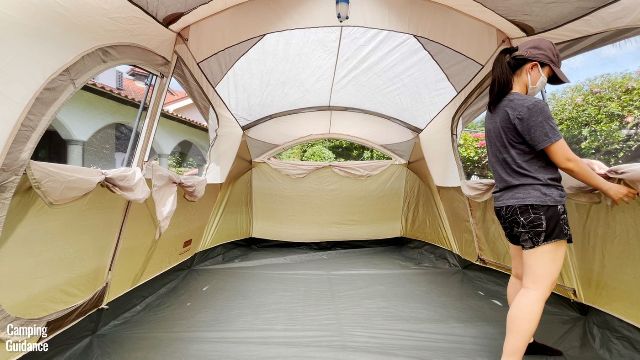
The hinged D-door of the WeatherMaster 10-Person Tent comes with Velcro attachments to keep it the door closed, even if you don't want to zip it up.
The hinged D-door of the WeatherMaster 10-Person Tent comes with Velcro attachments to keep it the door closed, even if you don’t want to zip it up.

Room Divider

The WeatherMaster 10-Person Tent comes with a removable room divider, so you can split the tent into 2 rooms.

The divider comes with these attachments that you can easily secure to the loops at the sides of the WeatherMaster tent.

This is a picture of me securing the attachments of the divider to the loops at the sides of the WeatherMaster 10-Person Tent.

Each “room” can then fit either 5 sleeping pads or sleeping bags, or 1 queen-sized bed plus an additional sleeping pad.

This is a picture of the WeatherMaster 10-Person Tent's room divider, with 1 sleeping pad and 2 double sleeping pads (so 5 pads in total) on one side of the divider.
This is a picture of the WeatherMaster 10-Person Tent’s room divider, with 1 sleeping pad and 2 double sleeping pads (so 5 pads in total) on one side of the divider.

One room, on the left side of the tent, will have one regular window, one angled window, and the back door. The other room, on the right side of the tent, will have one regular window, one angled window, and the hinged D-door.

The divider has a zip in the middle so that you can access either room, and you can also pull back the sides of the divider and clip it to the sides like this for easier access into each room.

This is a picture of my brother tying up the 2 sides of the divider, so that each room in the WeatherMaster 10-Person Tent can be easily accessed.

You can also fit just 1 queen-sized bed plus 1 sleeping pad in one “room” (see the picture above for this layout), and use the other as a living room, or something else, if you’d like.

What I did not quite like about this divider is that there are pretty big gaps at both sides of the divider, at the top of the divider, and there’s also a gap at the bottom of the divider. I wish it were more full-length.

This is a picture of my brother sticking his head out the sides of the divider of the WeatherMaster 10-Person Tent, which has pretty big gaps.

Storage

There are 4 pockets in the entire WeatherMaster 10-Person tent, 2 on the right of the tent, and 2 on the left of the tent. All the pockets are the same, measuring about 20 by 10 inches in this triangular shape:

This is a picture of me sticking my hand into one of the pockets of the Coleman WeatherMaster 10-Person Tent.

Other Features

There’s 1 lantern loop in the tent, at the very top of the WeatherMaster 10-Person tent, right in the center, for some lighting at night.

This is a picture of my Black Diamond Apollo hanging on the lantern loop of the WeatherMaster 10-Person Tent.

Also, there’s 1 e-port at the bottom of the tent with a zippered closure.

This is a picture of the e-port that comes with the WeatherMaster 10-Person Tent.

Ventilation

For ventilation, I looked at how much mesh the WeatherMaster 10-Person Tent has. After all, more mesh means more ventilation.

Ceiling Mesh

This WeatherMaster 10-Person Tent has a lot of mesh on the roof of the tent.

This is a picture of the ceiling or roof mesh of the Coleman WeatherMaster 10-Person Tent, with the rainfly removed.

The rainfly is removable, but only from the outside. I really like removing the rainfly during hot days for more ventilation. I could also stargaze at night when it’s not raining.

Window + Door Mesh

Apart from the roof though, the 2 doors and 4 windows are not exactly that big, unfortunately.

This is a picture of me opening up 5 windows in the Coleman WeatherMaster 10-Person Tent.

That’s why I enjoy removing the rainfly for more ventilation.

Rainy Day Options

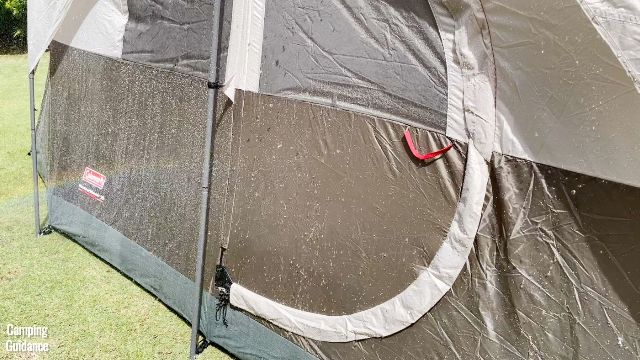
But thankfully, 2 of the windows are these impressive angled windows, which I was able to leave open even in the rain. And not just light rain, but moderate to heavy rain as well.

This is a picture of the angled window of the Coleman WeatherMaster 10-Person Tent.

There are no vents in this WeatherMaster 10-Person Tent, so it was good to have some ventilation through the 2 angled windows, and also from the gap between the rainfly and the ceiling mesh.

This is a picture of the rain avoiding the angled windows of the Coleman WeatherMaster 10-Person Tent.

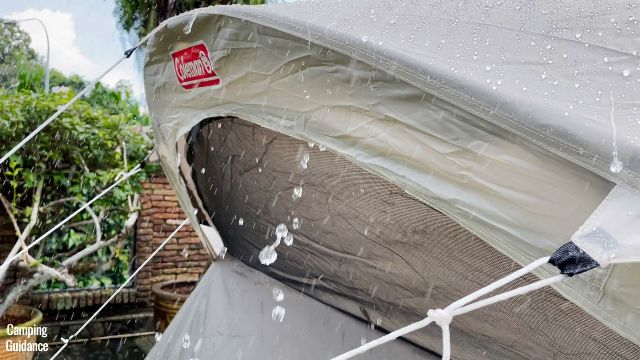
If there’s lots of wind though, and rain gets in through the angled windows (which didn’t happen for me), you can zip them close.

The other non-angled windows and doors have to be closed though, because otherwise, some water will get on the mesh of the windows and doors, especially when there’s wind.

That’s because the rainfly is quite small (which is to prevent water from seeping in through the ceiling mesh):

This is a picture of the rainfly of the WeatherMaster 10-Person Tent in the rain. Notice that it's quite small, and hardly protects the doors and windows at all, so you'd probably need to close them especially in heavy rain.
This is a picture of the rainfly of the WeatherMaster 10-Person Tent in the rain. Notice that it’s quite small, and hardly protects the doors and windows at all, so you’d probably need to close them especially in heavy rain.

Weather Protection

For weather resistance, I looked at rain and wind protection. (And yes, I actually rain-tested my WeatherMaster 10-Person Tent!)

This is a picture of my WeatherMaster 10-Person Tent in the yard in my yard. I used this picture as my thumbnail for my "Rain Testing the WeatherMaster 10-Person Tent" video on YouTube.
This is a picture of my WeatherMaster 10-Person Tent in the yard in my yard. I used this picture as my thumbnail for my “Rain Testing the WeatherMaster 10-Person Tent” video on YouTube.

Rain Test

It did not rain while I was filming this WeatherMaster 10-Person Tent for my YouTube channel, so I had to make do with this water hose.

This is a picture of me conducting a rain test on the WeatherMaster 10-Person Tent by using a stopwatch and a water hose.

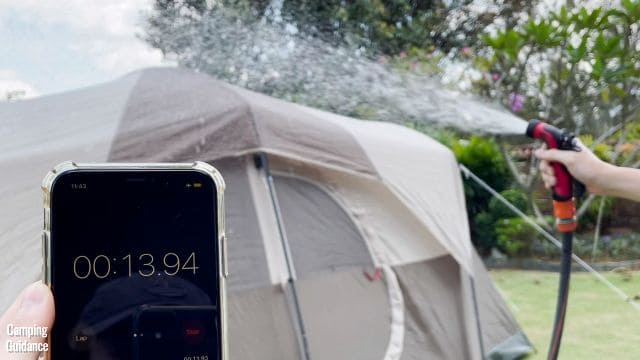
The water hose put the WeatherMaster 10-Person Tent through pretty heavy rainfall, I think. I did this for an hour, and concentrated the rainfall on the front length of the tent.

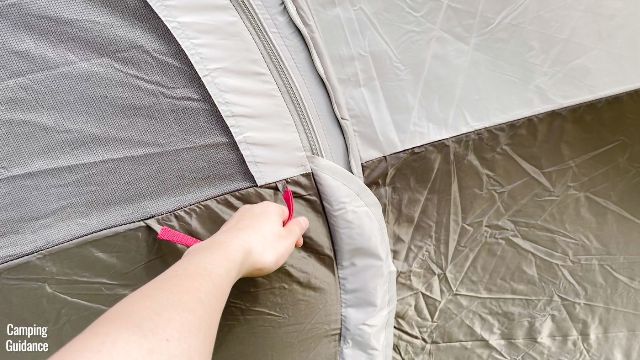
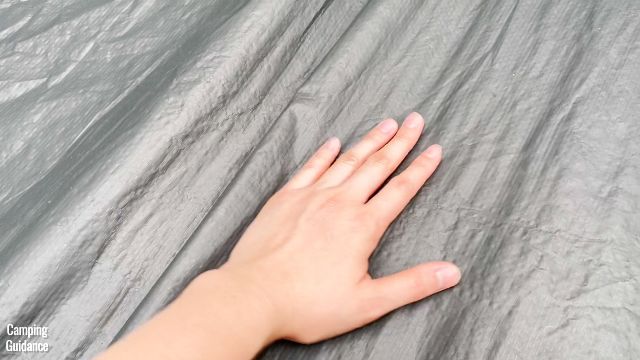
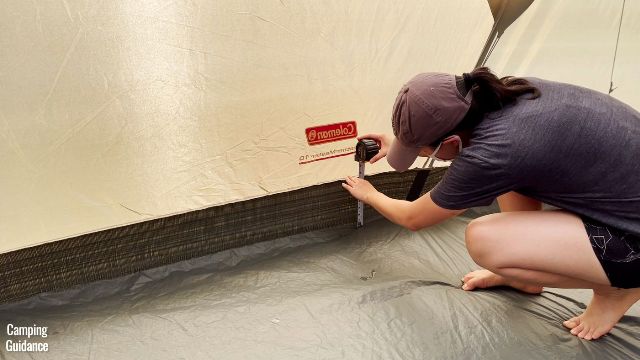
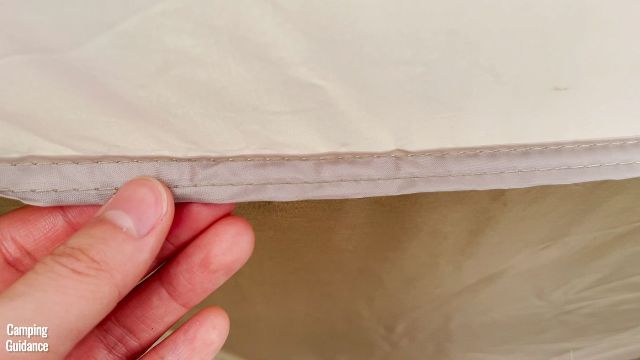
After about 15 minutes of moderate (arguably heavy) rain on the front of the tent, I noticed that water started leaking into the WeatherMaster 10-Person Tent through this seam connecting the dark brown fabric of the tent body to the bathtub flooring:

The inverted seam connecting the dark brown fabric of the WeatherMaster 10-Person Tent to the bathtub flooring was not seam taped by Coleman, so water started leaking in after about 15 minutes of heavy rain.

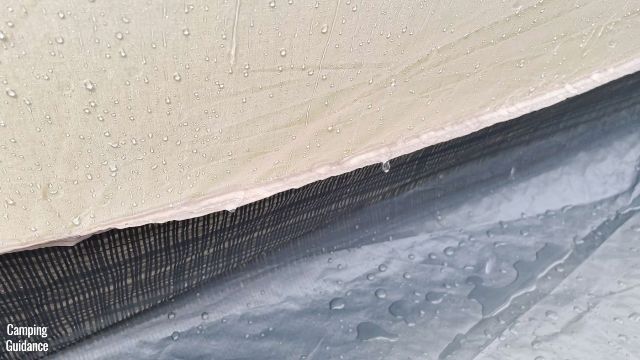
This is an inverted seam, but it has not been seam taped.

Actually, every single seam in this WeatherMaster 10-Person Tent is an inverted seam, so none of them were seam-taped. But I didn’t notice any leaking through most of them, except the one seam above.

This is a picture of me spraying water on the WeatherMaster 10-Person Tent. There's a rainbow too!
This is a picture of me spraying water on the WeatherMaster 10-Person Tent. There’s a rainbow too!

That’s probably because that seam was exposed to the most amount of water during the rain test.

The seam in between the tent body and the bathtub flooring of the WeatherMaster 10-Person Tent was exposed to a lot of water during my rain test.

When the 1-hour rain test was up, most of the tent body was still dry. However, the darker brown fabric was slightly damp after being exposed to an hour of this moderate to heavy rain.

I found that the dark brown fabric of the WeatherMaster 10-Person Tent was damp after an hour of heavy rain.

In 1-hour of light rainfall though, the darker brown fabric was still dry, though I did notice that the inverted seam of the bathtub flooring was leaking a little bit.

Tip: So basically, if you’re expecting any rain at all, even light rain, you’d need to seal this inverted seam here.

This is a picture of me touching the damp seam that the water was leaking through during my rain test of the WeatherMaster 10-Person Tent.

To check out the overall damage after the rain test, you can watch my short rain test video that I uploaded, right here:

Wind Protection

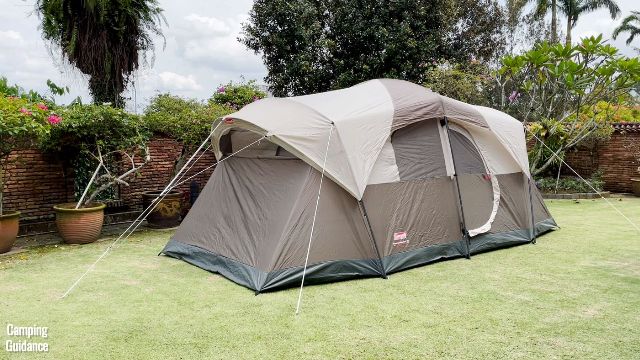
This Coleman WeatherMaster 10-Person Tent has a more aerodynamic shape than cabin tents, but even so it has a high peak height of 80.5 inches, with pretty vertical walls on the front and back length of the tent.

This is a picture of the back of the WeatherMaster 10-Person Tent. Notice that the wall is almost vertical.

Also, there are only 6 guylines in total for such a large tent. I noticed that it was able to stand up to light winds, as you might have seen from my YouTube video right at the top, but I’m not so sure about moderate to stronger winds.

Quality

For quality, I looked at the flooring, the main tent, stitching, and more.

Flooring

The flooring of this Coleman WeatherMaster 10-Person Tent is made of polyethylene.

This is a picture of me touching the polyethylene flooring of the WeatherMaster 10-Person Tent.

The flooring has a bathtub feature, which extends up to about 7.5 inches.

This is a picture of me using a tape measure to measure the height of the bathtub feature of the Coleman WeatherMaster 10-Person Tent (7.5 inches).

After 1 hour of moderate to heavy rain, I noticed that no water seeped through the bathtub flooring, and it was still dry, which was great.

Tent

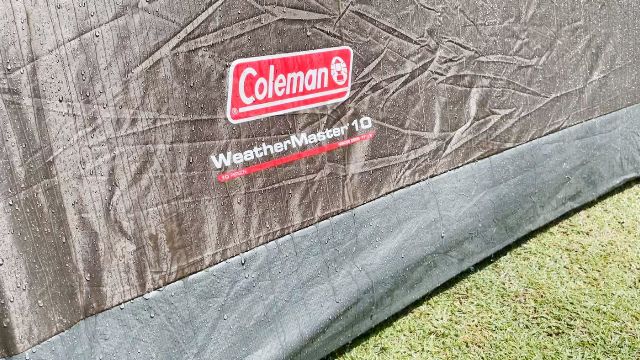
The main tent body is made of 68D polyester, and the rainfly is made of 75D polyester taffeta with 450mm of water resistance.

This is a picture of me touching the rainfly of the WeatherMaster 10-Person Tent, which is made of 75D polyester taffeta.

The parts of the tent protected by the rainfly were dry, but the dark brown fabric of the tent body that was exposed to an hour of moderate to heavy rain was a bit damp.

This is a picture of me touching the tent body of the WeatherMaster 10-Person Tent. This is the dark brown fabric of the tent body.

Stitching

All the seams in this WeatherMaster 10-Person Tent are inverted, and I found the stitching to be pretty good quality and consistent even on the doors and windows, with no glaring holes or anything, unlike some of my other tents.

This is a picture of the seam of the angled window inside the Coleman WeatherMaster 10-Person Tent.

Zippers

The zippers were pretty good quality, and I had no leaking issues through the zips or zippers on the windows and doors.

This is a picture of the 2 zippers of the hinged D-door of the WeatherMaster 10-Person Tent. The fiberglass pole for the hinged D-door is right above the zippers.

The windows were pretty much snag-free, and so were the doors from the inside, but the back door will still occasionally snag from the outside because of the rain cover, so I recommend holding the rain cover while zipping the door open or close from the outside.

Mesh

The holes of the mesh are too big to be no-see-um, but there were no holes or excess mesh in this tent at all, so I had no issues at all.

This is a picture of the bug net of one of the windows in the Coleman WeatherMaster 10-Person Tent.

Poles

So, after ~3 years of having this WeatherMaster 10-Person Tent, I noticed that some of the steel poles, the ones with this silver button in the picture below, became a bit stiff to put together.

This is a picture of my brother putting together one of the steel wall poles of the Coleman WeatherMaster 10-Person Tent while we were setting it up together.

But I really like how sturdy it feels after it’s been put together.

Also, the fiberglass pole for the curved part of the hinged D-door is quite thin, and because you need to bend it quite a bit, mine cracked after a while.

This is a picture of a small crack on my fiberglass pole for the hinged D-door of the WeatherMaster 10-Person Tent.

But I quickly just taped it back together using duct tape, and it still works fine.

Also, the tip of the fiberglass pole came out, and got stuck in the rubber gasket, but it still works great anyway.

This is the rubber gasket at the top of the hinged D-door of the WeatherMaster 10-Person Tent. Notice something stuck inside? That's the tip of my fiberglass pole.
This is the rubber gasket at the top of the hinged D-door of the WeatherMaster 10-Person Tent. Notice something stuck inside? That’s the tip of my fiberglass pole.

Guylines

I had no issues with the guylines, though it would be nice if they were reflective at night. But I do really like the guylines of the angled windows here, which keeps it sturdy.

This is a picture of the guylines of the angled windows of the WeatherMaster 10-Person Tent at night.

Portability

This WeatherMaster 10-Person Tent has a packed size of 31 by 18 by 12 inches. For a size comparison, here’s what it looks like beside a Coleman 2-Person Sundome Tent, as well as a 32-ounce Nalgene bottle:

This is the Coleman WeatherMaster 10-Person Tent (left) beside a Coleman 2-Person Sundome Tent (middle) and a 32-ounce Nalgene bottle for a size comparison.

The strap is barely long enough to be used as a shoulder strap for me, and it weighs about 30.6 pounds for everything.

This is a picture of me carrying the WeatherMaster 10-Person Tent using the strap of its carry case.

Pros and Cons

Pros

For pros, I found the WeatherMaster 10-Person Tent to be good quality and durable. All the seams are inverted, with consistent stitching, the zippers are nice and smooth, and I’ve used this tent over the past 3 years with hardly any issues at all.

This is the seam connecting the lighter brown fabric to the darker brown fabric of the tent body of the WeatherMaster 10-Person Tent.
This is the inverted seam connecting the lighter brown fabric to the darker brown fabric of the tent body of the WeatherMaster 10-Person Tent.

Well, I broke my fiberglass pole, but fixed it quickly with some duct tape.

One of my fiberglass poles for the WeatherMaster 10-Person Tent broke slightly, so I fixed it with some duct tape.

The next pro is that this WeatherMaster Tent has lots of great features, like the super, super user-friendly hinged D-door, that makes going in and out of the tent a breeze.

This is a picture of me closing the hinged D-door of the WeatherMaster 10-Person Tent from the inside.

It also has these huge angled windows that can be kept open in even moderate to heavy rain, so there’s some ventilation when it’s raining.

This is the Coleman WeatherMaster 10-Person Tent fully set up in my yard. Notice that the angled windows are open.

I also really liked that I was able to set up the entire WeatherMaster 10-Person Tent on my own, even though I’m not very tall, the pole sleeves are pretty snag-free (as advertised!), and it didn’t take me very long too.

This is a picture of me setting up the guylines of the WeatherMaster 10-Person Tent. I had set up the entire tent on my own.

And last but definitely not least, even though this WeatherMaster tent is feature-packed and good quality, I found it pretty inexpensive and it offers great value for money.

Cons

As for cons, I wish they made the non-angled windows a bit bigger for more ventilation during hot days. Right now, they’re not that small, but they’re far from big.

This is a picture of me opening up the 2 windows on the length of the WeatherMaster 10-Person Tent.

Also, I wish they taped this seam instead of making it inverted, because in my experience, inverted seams don’t really work that well, especially against heavy rain.

The inverted seam connecting the dark brown fabric of the WeatherMaster 10-Person Tent to the bathtub flooring was not seam taped by Coleman, so water started leaking in after about 15 minutes of heavy rain.

Some smaller cons is that the room divider has pretty big gaps at the sides, and Coleman should also have made the carry bag a bit bigger, because now it’s a pretty tight fit to get everything back in.

Recommendation

Overall, I felt that the pros greatly outweighed the cons, and actually if you just seal the leaking seam yourself, there are hardly any cons at all.

This is a picture of my WeatherMaster 10-Person Tent illuminated with a lantern inside the tent.

This WeatherMaster 10-Person Tent has worked really well for me over the past 3 years, and I got insane value for money out of it, for sure.

Bonus: Must Read!

How does this WeatherMaster 10-Person Tent compare to other similar tents though? Well, don’t worry, because I’ve already done the comparison for you, in this blog post right here, where I bought, tested and compared 6 of the best 10-person tents.

This is a picture of me testing out 4 of my 6 best 10-person tents. From left to right, the Coleman 10-Person Instant Dark Room Tent, the Core 10-Person Straight Wall Cabin Tent, the Columbia Mammoth Creek 10-Person Cabin Tent, and the Coleman WeatherMaster 10-Person Tent. (Not pictured: Outdoor Products 10-Person Instant Tent and Ozark Trail 10-Person Cabin Tent).

I also pitted the WeatherMaster 10 against 13 other Coleman tents in this blog post right here, where I bought and tested 14 of the best Coleman tents.

This is the thumbnail I used for my 14 Best Coleman Tents video. From left to right: Coleman Instant Cabin 4-Person Tent, Coleman WeatherMaster 10-Person Tent, and Coleman Sundome 6-Person Tent.

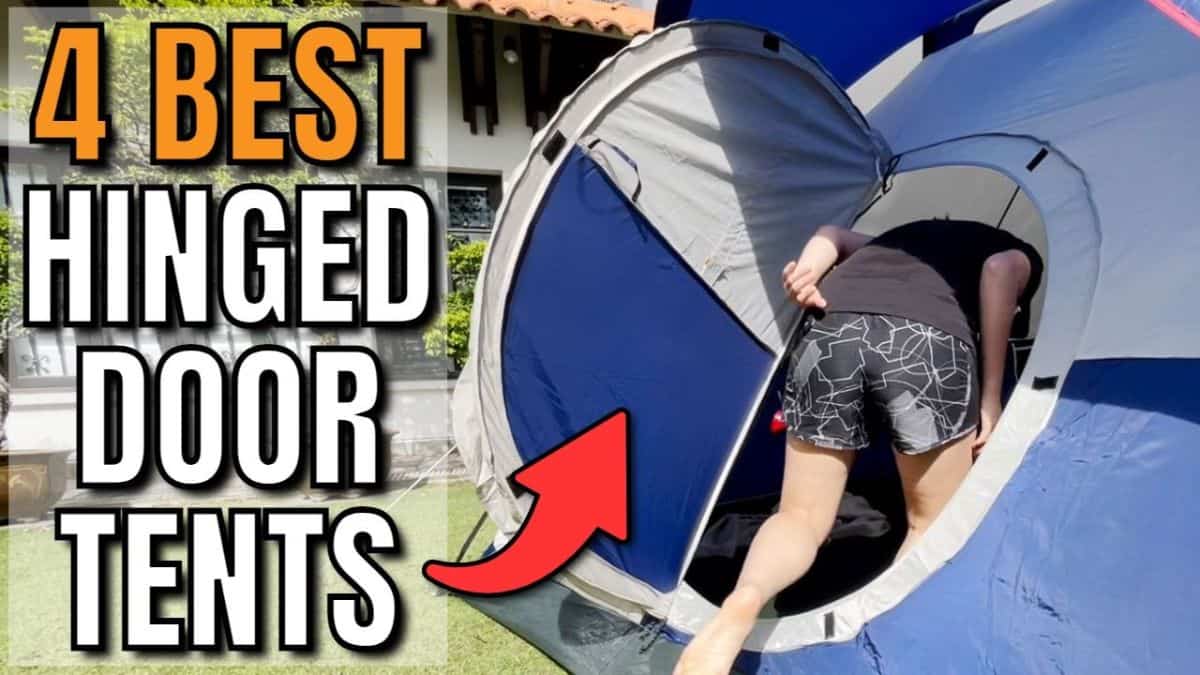
Alternatively, check out this blog post also featuring the WeatherMaster 10: I Bought & Tested the 4 BEST Hinged Door Tents!

This is a picture of me going through the hinged door of the Coleman Elite Sundome Tent.

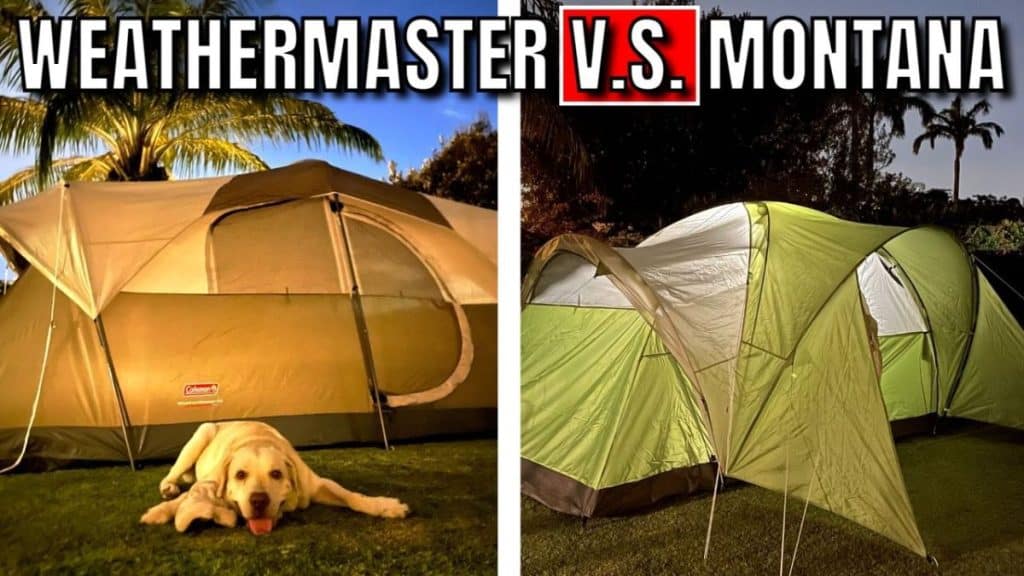
To find out how the WeatherMaster 10 compares against the Montana 8, check out this blog post: Coleman WeatherMaster Tent V.S. Montana Tent (I Bought Both!)

This is a picture of my Coleman WeatherMaster 10-Person Tent (left) and my Coleman Montana 8-Person Tent (right).

Or, check out the WeatherMaster 10-Person Tent:

Similar Posts